As you may know the home control software can work with Nextion displays and there is a project on the blog on that subject – I note that one or two people are having issues here so rather than reply without pictures – here’s a general update.
 Currently with the home control software, version 1.531 (see right) and Nextion Editor version 0.36 (it just updated on my automatically) and I’m doing this on Windows 10.
After powering up the home control board, you MUST for the first time issue the instruction {set_serial:2} to the ESP8266 at which point the board will reboot and part of the start up serial info will show as on the right – “Initialised software serial to 57600 baud” – this indicates that the unit is ready to work with the Nextion display. GPIO4 and 5 are used for this purpose and the Nextion board can be powered directly from ours. Ground, to_nextion, from_nextion, 5v – that is how our board is marked but of course you don’t need to use our board. Incidentally don’t be tempted to use your 5v FTDI to power any but the smallest of Nextion boards – I tried this on the large 7” model and killed the FTDI…you’ll need a separate (common ground) power supply for that and most likely anything over the 4.2” display. Don’t forget to change that set_serial command if you plan to use GPIO4 and 5 for something else as the setting is stored in FLASH.
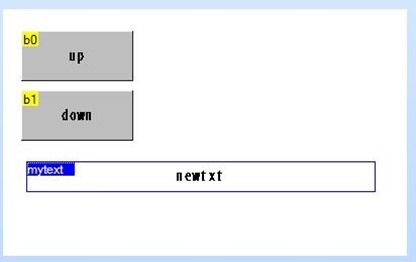
In a simple test I have a plain Nextion panel with two buttons on it. In the background to the page – in the Nextion Editor – I have a “preinitialize event” which contains nothing more than “bauds=57600” without the quotes – this ensures the Nextion board powers up at 57600 baud for the purpose of sending data back and forth.
The two example buttons are marked “up” and “down” and the “touch press event” for each is as follows..
get “nodered~up”
and
get “nodered~down”
If you look at my documentation – this is a notation I created that returns the above – for example the first one, to the ESP8266 and converts that into an MQTT message:
topic: nodered
payload: up
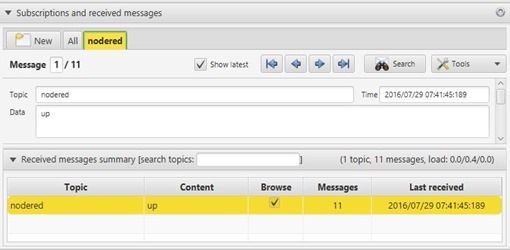
That’s it – press the up button and the message “up” is sent to topic “nodered” – could be any message you like – and any payload. You can use this directly to turn things on and off without even passing through Node-Red – OR you you have node-red intercept the incoming MQTT message and do something with it. So pressing a button might have an effect on the Nextion display for example. If you see the Nextion WIFI touch-display project you’ll see you can get WAY more ambitious than just a couple of buttons.
And lo – as I press buttons – you see the messages coming into MQTT-SPY (or whatever you use to test your MQTT).
That just leaves output to the Nextion itself from the board.
Again for the purposes of demonstration I add a text box in the Nextion editor – the default name for the first new text box would be “t0” so I rename this to “mytext”.
Not very pretty and normally I would NOT use their buttons etc. but make up my own imagery using PowerPoint or similar – but it’ll do for demo purposes.
 Now I have to say, the worst part of this is the Nextion editor – progress is moving slowly with this – when you come to program it – make sure you have the right port address because it is hopeless at searching – and if it gets stuck you end up using task manager to reset it – comes up as PRJ or something – I’d so like to get my hands on the source code to give it a good shake-up.
Anyway, there it is- you end up with a window in this case with default text “newtxt”.
![nextion display[5] nextion display[5]](http://tech.scargill.net/wp-content/uploads/2016/07/nextion-display5_thumb.jpg) Fire out the command {to_nextion:”mytext.txt=\”Hello\””}
Fire out the command {to_nextion:”mytext.txt=\”Hello\””}
You can do this serially or via MQTT- as the example from MQTT_spy shows.
This results in “Hello” without quotes appearing in the text box. Why the backslashes – that is to “escape” the quotes so they don’t end up terminating the string above – in other words so the quotes are passed through.
The WORD manual for my software describes the “to_nextion” and “set_serial” commands.
Have fun.


![mqtt-spy[7] mqtt-spy[7]](http://tech.scargill.net/wp-content/uploads/2016/07/mqtt-spy7_thumb.jpg)