Quantcast
Channel: nextion – Scargill's Tech Blog
Viewing all 32 articles
Browse latest View live

Nextion Displays and the ESP8266

$
0
0

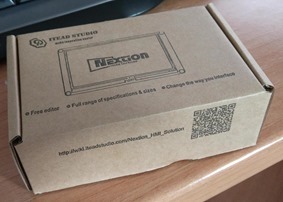
the Nextion boxSo a parcel arrived for me this morning in the post. A Nextion display. And what is that, you may well ask?

Think of something like a thermostat or really any home control situation, at some point you have to stop sending text commands from an expensive PC and reduce the operation down to neat and tidy button pushing so that everyone else in the house can actually participate in your invention!

This is where things often fall down, the “Heath Robinson” home-made-looking box with pretty awful buttons telling everyone you have “amateur” status.   Now of course, today, you could choose to use a second hand phone or tablet for your wall-mounted family-friendly display and control panel… OR you can use a touch-sensitive display.

These are REASONABLY cheap – for example….  http://www.banggood.com/UNO-R3-ATmega328P-Board-2_4-Inch-TFT-LCD-Screen-Module-For-Arduino-p-945755.html

So this is an Arduino + touch display for under a tenner. You have to sort out libraries and basically write everything from scratch – and that’s fine – but time consuming.

Te Nextion PCBAnd so it was that my friend introduced me to the Nextion displays. This is a display board that isn’t too expensive – and which has everything built in. Essentially, on a PC you run a free editing program, tell it where you want buttons, text and images and what should happen when you press the buttons.  A button lets you download that to the Nextion board and “Bob’s your uncle”.

The board has only 4 pins – power (5v), ground, serial in, serial out. Press a button and stuff comes out of the serial pin at logic levels and 9600 baud.

You really can’t get any easier than this. Perfect? No, far from it. In my initial trials. the editor has some polishing to do, my first attempt at running the font convertor on a Windows SANS font produced a pretty awful output and I’ve clearly got a learning curve ahead of me – but after 15 minutes I have a display running with serial output on button press – that is one HELL of a lot faster than any other way I can think of.
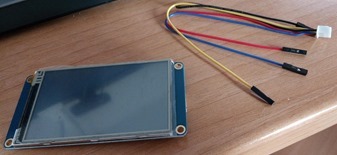
Nextion displayThe board has another advantage over alternatives – the whole thing is very THIN and so will easily fit into a nice slim wall mounted case.

You could choose to run the board serially – OR via something like an ESP-01 and that is almost definitely what I will be doing.

I’ll have the EXP capture button outputs and send MQTT commands back to base – and accept MQTT commands and send them to the display.

Welcome to NextionWhen you first power up the unit, it comes up with a nice display and responds to button presses… so that gives you a feel for how things will work – that’s before you do any programming – just power the board up.

All you have to do is use the PC software to drop  in some screens, some buttons and some dials and off you go.

So that’s the theory – what is the board like in practice. I have to say that my first experience suggests that the translations have some way to go.  The simplest thing you can do is have a button send something out of the serial port when you press it.
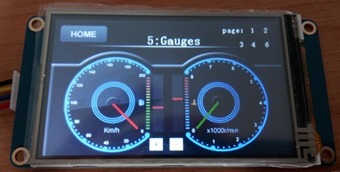
GaugesThat is a 5 seconds job to implement – but it took me nearly an hour to realise because my friend who has already done this showed the use of an on-press function called PRINT which on his board works on it’s own. With the new software you build up commands and add a special command at the end to send everything out of the buffer. Until I found that command, mysteriously named “com_star” which I’m going to assume means “comms_start” – I was lost.

So commands tend to end with a binary zero for reasons I’ve not yet figured out… and at the end of any command, incoming or outgoing, you have 0xff 0xff 0xff  (i.e. 3 bytes each one binary 255).  That in itself makes testing interesting as a simple ASCII terminal might have difficulty with the terminating characters. Not sure what’s wrong with a simple carriage return myself – but I’m sure they have their reasons.

Now that I KNOW – it’s easy. Kind of – the manual needs a lot of work – but I guess it is early days yet – as long as they keep improving things, this little display could well be a winner.

The thing that stuns me the most – looking around the web – is people using this with an Arduino – with an ESP8266 stuck on the end for WIFI! Seems like major overkill to me not to mention the cost.  An ESP-01 talking to one of these devices, with 512k programming space on the ESP, it seems to me one could accomplish one hell of a lot!

Right now  I have the Nextion sending out instructions when a button is pressed, via it’s serial – at 115,200 baud. The text is encoded to be the same as my home control. My home control boards are of course ESP8266 and I’ve used a resistive divider on the serial input…  All good fun.

UPDATE: See comments in here – lots of issues with the software right now – this is not going to be as easy a ride as I thought…. comparison operations that just don’t work – we’ve been writing to the designers all day and I hope that our issues will be sorted. Right now you may want to consider this a work in progress – SO many possibilities but not without pain it would seem. More as we get responses to our questions.

facebooktwittergoogle_pluspinterestlinkedin

Raspberry Pi Serial and Node-Red issues

$
0
0

SOLVED: Node-Red serial I/O

serial

Looks simple doesn’t it – tie RX and TX together on your Raspberry Pi and press the button – text comes out of the other end – except that it doesn’t. More likely the Pi will CRASH (not something you see every day).

Serial out seems fine – no error messages, you can change baud rate and according to my scope, all is fine on pin 8 of the RPi2.  Input on the other hand, can cause interrupt issues, messages on the console and crashing – and almost never actually produces any output.

So what is the problem?Well, one of the guys at the Node-Red forum set me onto this link.  http://jeelabs.org/2012/09/20/serial-hookup-jeenode-to-raspberry-pi/

And therein lies the problem – by default – the RPI uses the serial port for communications. Trying to add another hook to the serial in interrupt – kills the Pi.

The solution is simple – extracted from the above link.

  1. edit the file /etc/inittab as root (I used “sudo vi /etc/inittab”)
  2. change this line: T0:23:respawn:/sbin/getty -L ttyAMA0 115200 vt100 to#T0:23:respawn:/sbin/getty -L ttyAMA0 115200 vt100. I.e. comment it out, and save these changes.
  3. run the command “sudo kill -1 1” to pick up these inittab changes

And that  – was that  – I now have comms in and out  – the idea being to put a serial display such as the NEXTION onto the Pi with simple touch input commands – and an output display showing status, temperature etc. DODDLE in Node-Red once you have serial up and running.

facebooktwittergoogle_pluspinterestlinkedin

Nextion Talking Thermostat

$
0
0

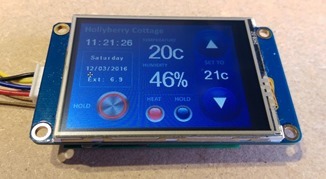
main page on Peter Scargill's talking thermostatYes, I changed the title. As often happens with these things, I got carried away.

The Nextion display is a touch-sensitive intelligent display.  Essentially, you buy the display and you program it with a free editor serially – which lets you easily place icons, buttons, images, text, gauges and more on the screen. For any of these you can have the unit send serial messages on press, release etc. You have serial control over the display itself and you can have as many “pages” of information as you want.

So for example if I place a text box called “mytext” on page “home” then I can send the serial command home.mytext.txt=”Hello”

Easy. So it can then talk to just about any micro – Raspberry Pi, ESP8266, Arduino etc via a simple 2-way serial link. What’s not so easy is the fact that it is taking them a long time to get the editor and interpreter right and some stuff just doesn’t work – even basic comparisons in it’s internal interpreter. Having discovered that when I first looked at the product, I put the Nextion to one side for a while. You can’t do multiple copy and paste, if you delete a library image you have to change the ID of all other images you’ve used – the list goes on – my suspicion is that one overworked, underpaid guy is doing all the development and it’s the first time he’s done this. I could be wrong.

NOT withstanding the above – the display has tremendous potential and you can work your way around most of the issues.

This week I began to think of the display from another angle. What DOES work is image, button and text placement, serial updating and serial out. So basically if you think of the Nextion as a programmable dumb terminal, then THAT works and works well once you get used to and work around the issues (images stored on the device are stored by number. Get rid of one and all your references are wrong. Just little things like that.

Security on Peter Scargill's talking thermostatI began to ponder how it would be if I used Node-Red on the Raspberry Pi (or on anything that handles Node-Red and serial, really) to do the work – after all, there are no real limits to program complexity on the latter and it works – so use the Nextion for what it is good for!

With that in mind I set about installing the serial node on Node-Red – that went very smoothly (using Raspi-Config initially to turn the serial on).  The first hurdle however didn’t take too long – the Pi crashed whenever I tried to use serial in. It turns out that RPi already has it’s own use for the serial – as a terminal. So this has to be disconnected first.

sed -i “s|T0:23:respawn:/sbin/getty -L ttyAMA0|#T0:23:respawn:/sbin/getty -L ttyAMA0|g”  /etc/inittab
kill -1 1

At a terminal I issued the above commands – in other words commenting out the start-up condition that has the Pi using the serial in interrupt– and also killing it now to save having to reboot.

That done, I tried again – there is still some information in the serial buffer at power up which I’ve yet to figure out how to stop – but matters not, it’s easy to clear out the serial buffer during init in Node-Red.

controls on Peter Scargill's talking thermostatThe next hurdle… the Nextion (quite reasonably) expects normal 8-bit serial strings – and sends back normal 8-bit strings – in each case with 3 characters appended to the end. FF FF FF.   or 255, 255 255 (why couldn’t they use \n like normal people… however…), All of that is great but Javascript, which is the base language behind NodeJS – and hence used in the functions of Node-Red – uses 16 bit strings!!

I had to get onto the guys working on Node-Red for help here – and to cut a long story short, a simple function added to the Serial nodes sorts that problem out. Great support is available for Node-Red on Google forums.

So in my case I wanted a simple thermostat display with up and down controls. I have a property which we holiday-rent out in the summer and that is about as much as I’d like end-users to control.  On the other hand, when we’re at home I want to do so much more.  So I decided that what was needed was a basic stat display page, a login page, a menu page then as many extra pages as needed.

The only control on the home page other than up and down would be a little menu button taking you off to a keypad log in – and maybe an “about” page. That would be the end of the line for our customers who would then have only one option – return to the home page.

For my wife and I, successfully logging in would then take us to a menu – and all pages would come back to that menu – which would also include a log-out button and of course I’d want RGB lighting control, heating adjustments etc etc….

Armed with a dumb Nextion with buttons and textboxes in place, I set about writing code for Node-Red. I would need outputs for serial, debug and MQTT to control things based on key input from the display.

Node-Red flows on Peter Scargill's talking thermostat

One of the things I like about Node-Red is that you can outline things long before you actually put code in – and that helps simplify programs. So as you can see here, I have serial coming in – it gets converted from the format that the Nextion understands – to simple text and back.  In addition you need start-up conditions – and display automatic updating – hence the two inject nodes. Using global variables for temperature and set temperature, I wanted it so that if I changed those variables elsewhere they would update on the display.

Pallette on Peter Scargill's talking thermostatThe Nextion online manual will tell you how to upload fonts and images to the Nextion – you can use buttons – or you can use images and overlay rectangular hot-spots on the image.  Their own buttons are AWFUL and it is hard to get fonts off your PC to look good as there is no anti-aliasing – however – by a combination of static images and using variable text only where actually needed, it is possible to get a nice looking screen or screens.

About page on Peter Scargill's talking thermostatAt some point I will document all of this – the “process commands” function is the most complex and even then, really it is mainly a set of nested switches and little else. The thermostat logic I’ve done separately but may do again to take into account humidity and outside temperature – not rocket science. They key here is that the Raspberry Pi seems to be quite solid as long as you keep SD writing to a minimum. It is now quiet simple thanks to BerryBoot to make backups…. as long as Nextion don’t totally annoy everyone by releasing the editor before it is ready – I see a bright future for this setup. The display I’m using is the 400*240 touch display. I have a pop up page for selecting light colours as I plan to use this for lighting control – not quite there yet but the mechanisms are in place – right now I’m having way too much fun doing the thermostat bit!!

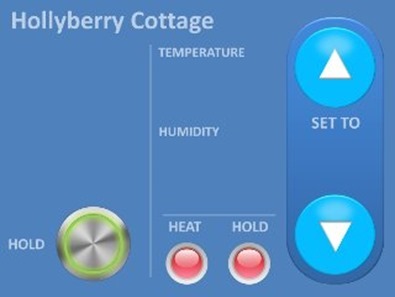
As for the display, well basically for inspiration I went off looking to see what the pros are up to with displays and a particular Honeywell display caught my eye. Next thing I was off to PowerPoint to design the screens – it now looks only superficially like the original – but I liked the way they split up the main screen into sections.

Oh, and these displays are NOT expensive – check out AliExpress for example.

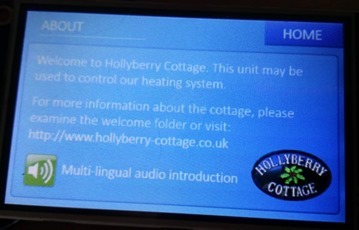
International options on Peter Scargill's talking thermostatNow, you might think “enough is enough” but I’ve also been working on speech for the Raspberry Pi and as of today I’ve pretty much gotten to grips with that – and so I thought – why not. You’ll notice on the “about” page over on the right, there’s a “multi-lingual audio introduction” – and why not – it’ll give the guests a laugh. The stat function has 2 on-off times a day and weekdays and weekends are programmed separately. There is a manual override for the “set” temperatures which lasts until the next change of settings. So if you set the unit for one temperature in the morning until lunchtime and another from lunchtime on – manual override done in the morning will last until lunchtime before going back to the default settings.

My third success of the week – taking my router back to factory default seems to have solved the “race” condition that’s been plaguing me – which means my ESP8266s are working again – the good part of that was that I originally thought it was the ESP8266s themselves causing problems so I’ve tightened up on handling lost of WIFI situations which seems to have made them more or less bullet-proof.  As of this morning the full set of thermostat background controls are in and all that is left to do is implement the actual logic – a little something to stop excessive turning on and off, a little hysteresis…. and we’re reaslider on Peter Scargill's talking thermostatdy to rock!

Next step – web-socket to serial conversion – though I could use MQTT – so that I can have a slave one of these stats powered by a little ESP8266.  Our cottage has upstairs and downstairs and so it would be handy to have both the master control and a copy of that upstairs. 

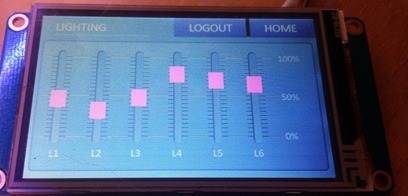
NEXT: Coming up – lighting control…. I have already made the panel (who knew I could design graphics) and there’s a little logic to go to make it work but as you can see here the slider panel is well under way…

Despite the resistive interface, the sliders are quite responsive and should work well as a local alternative to my normal JQuery Mobile panels for local use around the house.

facebooktwittergoogle_pluspinterestlinkedin

Some thoughts on Node Red variables

$
0
0

In learning how to use Node-Red I’ve changed my coding countless times as I’ve found better ways to do things.

I’m currently working on my thermostat code using a Nextion touch-sensitive display, Raspberry Pi2 as controller and ESP8266s for relay and temperature/humidity sensing. This was a slow-running project until my old Arduino-based heating controller packed in yesterday without warning and so now the fate of the household heating is in the hands of an on-going project.

So the general idea is easy enough – lots of settings for weekdays and weekends, read sensor, control relay. That’s pretty much it in a nutshell except that on my first attempt I didn’t take into account power cuts – and when the power was restored to the Pi, hardcoded defaults took over instead of the settings I’d put in using the display.

So there’s a need for lots of variables and a means to store them permanently. This is what I’ve come up with and the logic behind it:

In order to pass variables around in Node-Red, you need to use “context.global” variables as these are the only ones that will work from page to page (i.e. from powering up node-red to powering down across all pages of your project). This can make for messy variable names for those of us who like to keep things short because we’re lazy or developing typists finger.

context.global.stat_inside_temperature

etc..

I’m a C person and so a struct is ideal for me – keeps everything together.  The nearest I get to that in JavaScript is an object and that’s fine.

A global object containing everything to do with my stat.

   var stat = {
    display_temperature : 22,
    display_humidity : 45,
    heating : 0,
    display_external_temperature : 14,
    display_external_humidity : 54,
    display_status : "Normal",
    display_target_temperature : 20,
    display_enabled : 0,
    display_last_page : "home",
    display_last_colour : 0,
    pass : "",
    display_dim : 60,
    peak : 21,
    night : 16,
    frost : 12,
    hold : 0,
    weekon : 480,
    weekoff : 720,
    weon : 480,
    weoff : 720,
    week2on : 780,
    week2off : 1380,
    we2on : 780,
    we2off : 1380,
    temperature_manual_override : 0,
    update : 0
};

That stat var of course is only valid while the relevant function is in use and is invisible outside of that particular page hence…

context.global.stat=stat;

So now we have a nice but somewhat longwinded way to access the variables..

context.global.stat.display_temperature;

(I know I should probably use displayTemperature but there’s no global replace in the Node-Red editor (hint)).

Because JavaScript objects are passed by reference – you can use a reference to this in other pages which makes things a little more readable.

var stat=context.global.stat

Hence

stat.display_temperature;

That’s more like it and you can write to that new variable and it will update the original as they are one and the same.

The obvious solution for storing variables permanently, is a database, but I’m trying to minimise that to keep writes down for the time when I run all of this and much more on an SD (currently using a little 2.5” drive with the Pi2).

The file node lets you read and write text files and so the next challenge was how to get that object into a text file – easy:

msg.payload=JSON.stringify(context.global.stat);

That JSON string can be saved directly to disk and the inverse is true of course…

context.global.stat=JSON.parse(msg.payload);

The good part of that is that the string saved to disk is readable and if need be directly writeable.

Thankfully when the file node reads a file if the file is not there, it returns “undefined” so in my function I check for undefined and if so – create a new one with defaults in it. I added a timeout variable in there and whenever I update any item in the object I also set a counter to 10.  That counter is decremented every second and when it reaches zero, the object is updated on disk. That means I can do all sorts of adjusting of controls on the Nextion display and only when I’m done will there be a single block write to the disk. The READ is only done once when Node-Red powers up.

Seems like a reasonable solution and it’s nice and warm in here.

In an earlier blog you’ll see my Nextion display solution which is quite pretty ( created my own imagery because built-in Nextion options are currently not that good) – here just for reference is the current Node-Red block controlling the display and the stat itself including disk reading and writing.

tmp7866

facebooktwittergoogle_pluspinterestlinkedin

Nextion and ESP8266

$
0
0

Nextion and ESP8266 - Peter ScargillEver since I fell in love with the little Nextion displays I’ve been thinking about a little ESP8266 board to go with them – well, I’ve been beaten to it.

Today I received in the post a little box from Guy Molinari with his efforts – I have to say THANKS GUY. So what you are looking at is a small ESP8266 board complete with ESP12 that sits on the back of one of the smaller Nextion displays (coming soon, review of the 7” model Nextion).

Nextion and ESP8266 - Peter ScargillI opened the box, plugged power into it and 4 buttons popped up – press the buttons – they trigger outputs – it’s as simple as that. Really, that simple.

Of course – that’s only the tip of the iceberg, you could put MQTT on the ESP and have it send MQTT messages off (which is exactly what I plan to do) – and as you’ve seen in my other blogs on the subject, making the Nextion displays pretty with some PowerPoint imagery is simple.

If you’re wondering what the hell I’m on about – the Nextion displays are a smart touch-display – which have TTL serial in and out – and that’s how you talk to them – ideal then for the ESP8266 which just happens to have serial in/out as well as WIFI.

Nextion and ESP8266 - Guy Molinari BoardThe total cost of this is not high and so with a suitable case (which is ALWAYS the problem – DO let us know if you have solutions (but don’t say “just print one out on your kitchen 3d printer) there are possibilities here from home lighting to heating and security controls – you name it. The development kit for the Nextions is online so all you need is the actual display.

Getting a board that is a comfy fit is another matter and it looks like Guy has taken on this challenge – if you want to know more – reply in here and Guy will be looking in.

I think I may had a specific use for this board – I have a high end control panel for my heating but upstairs nothing – so take this board, put it in a box, have the buttons send MQTT messages and receive a temperature update and you have a tiny, tidy little ancilliary controls.

Right – I’m off to Ebay in search of a box. Talk to Guy in here if you want more info.

facebooktwittergoogle_pluspinterestlinkedin

Enter the Nextion 7” Display

$
0
0

Nextion 7" displayIn previous blog items I’ve mentioned the Nextion displays. These are a fairly unique product in that they offer a simple to use LCD touch display which works serially – and hence are not tied to any device – and they don’t need drivers.  I have a very nice “proper” touch display for the Raspberry Pi – one of the originals – but things have moved on and all efforts to get it to work with the Pi2 have failed to date.

The Nextions on the other hand are meant for embedded applications – via a freely available editor you position zones on the screen and define what touching them will send out of the serial port – and you position images an buttons on-screen from a library. I have to say their graphics are pretty limited but in my case, I simply put together imagery from PowerPoint or web resources and use those.

There is a current limit of not being able to handle transparent PNG devices but that is software only and no doubt with enough badgering that will be resolved. In creating imagery for my heating and lighting controls I had no problems doing the lot with PowerPoint and saving the resulting .PNG files. The new large display opens up a whole new raft of possibilities.

ITead Studios could improve their advertising – “Nextion 7.0'' HMI TFT Screen Intelligent Display Module with integrated 4-wire Resistive Touch Panel For Arduino DIY” – no – it’s a general purpose 5v serial display for ANY embedded processor as long as it has serial.

This link shows you what boards are available http://wiki.iteadstudio.com/Nextion_HMI_Solution with the 7” being the largest of the lot and the highest resolution at 800*400. Previously I’ve used the NX4024 at 400*240 resolution.

Nextion 7" displayBut THIS monster, the 7” has 4 times the amount of FLASH memory (16MB)  of the smaller one – and both have micro SD sockets so you can store images separately if required.

My first challenge will be to find a suitable frame (I’m thinking possibly some kind of picture frame) to stick this on the wall but whereas the smaller displays, cute as they are might just be a tad difficult for anyone with visual issues to use – this monster should be visible from the far end of a large room!

Sticking an ESP8266 running MQTT on the back of this would be very simple indeed and from there the whole screen could be monitored and updated from, say, Node-Red on a Pi (which is exactly what I plan to do).

Coming soon – the mother of all Thermostat displays Smile Not cheap at just over £50 but then SO very easy to use. Someone suggested to me in my last blog –why not use an Android tablet? Trust me I’ve thought about this often as tablet capacitive touch screens tend to be a little easier to use than resistive touch screens.

1. The Nextions are simply to use – requiring 5v and TTL level serial only – straight onto a typical single-chip micro.

2. The software is done – not stunning – but it is done. In 15 minutes you can have a basic, programmed display ready to work in your project.

3. The resistive touch screen, especially on the larger displays, will work with gloves.

But if someone came up with a suitable environment for cheap tablets – complete with editor, software to ensure the display came up and didn’t power up somewhere else or be able to escape from the dedicated program to elsewhere, then the large Nextions would have competition (though not for power consumption) – but as far as I know, right now it is the only game in town for a simple, quick touch display without having to learn a new language etc and which can be attached to anything – ESP, Arduino, Pi, you name it.

Prove me wrong.

Only ONE problem with the large display as I just discovered… power is way beyond that provided by a simple FTDI so plan to give it separate power when programming!

facebooktwittergoogle_pluspinterestlinkedin

The Nextion Experiment

$
0
0

Nextion BoardOur latest experiment! The board you see to the right should be with us in a couple of weeks. This little number will sit on the back of a Nextion board, from the smallest to  the largest without adding any height (hopefully) and contains as you see an ESP-12 and supporting components.

The extra connectors are just to give it a more general usefulness.

Having implemented software serial on GPIO4 and GPIO5, the board will allow for sending messages via MQTT directly to the Nextion while still allowing debugging and programming of the ESP using the normal ports. 

Far better I think than strapping a Raspberry Pi onto the things. We’ve not tried to do anything too clever here so this all assumes the display is already programmed up.

My own use for this is a couple of simple wall units to show and control heating and lighting… I already have a display hooked up to a Raspberry Pi for general control but it’s a tad excessive having those plastered all over the house hence this board which we’ve had made as thin as possible.

Can’t tell you much more until we get the boards back and give them a go.

Currently ending my first week of a 2 week contract (well for now anyway) over in Spain so my ability to experiment is severely hampered as you might expect (but that is compensated for by sunshine). 

By the time I get back to the UK  I’ll have some more Sonoffs to play with (hopefully the later types with one of the LEDS attached to GPIO13 on the ESP8266) and some new ESP-related stuff to review.  My new workshop is up – just needs electricity, insulation, desks, shelves – no problem really!

facebooktwittergoogle_pluspinterestlinkedin

UI Update

$
0
0

I’ve been busily beavering away at a commercial project for the last couple of weeks but that ends at the weekend and I hope to soon have some more reviews of new and interesting products for you including some surprisingly cheap SBCs.  Meanwhile, close to the heart of many of use – the IOT user interface remains a challenge. There are several of course – the dashboards are great unless you want to control something – and you will know that in this blog I’ve discussed the Node-Red UI and Blynk to name but two.

I dismissed Blynk because the interface though beautiful was simply too buggy – or rather a combination of that and the Node-Red interface. Well, the good news is that part of that problem is solved. TZAPUs new web sockets code seems to be rock-solid. The only bit of the puzzle that needs fixing is the actual Blynk App. For reasons beyond me no-one seems to have noticed that if you PAUSE the APP and then continue, it knows nothing of any changes that happened while it was paused. Come out of it and go back in and fine – it picks the info up from the server – but simply pausing is an issue – maybe no-one thought that something other than the APP might be controlling your IOT – yes, hard to believe. However this morning I got acknowledgement that this will be fixed on the next sub-release – which means that by the look of it we have a fully working interface.

Meanwhile node-red-contrib-UI is due a facelift and Andrei has been working on that – sadly despite spending ages on this I’ve been unable to get the new upgrade to work – I’m confident however that this will be resolved.. and then we will have at least two decent, easy to use interfaces between Node-Red  (and hence most if not all IOT) and our phones.

Time will tell. This weekend we’re off to visit friends, next week I’m putting my office together and hopefully collecting some PCBs to control Nextion displays and as soon as my new office is in a state to do some R&D, expect to see new reviews and more info.

facebooktwittergoogle_pluspinterestlinkedin

Wifi Nextion

$
0
0

Regular readers will remember me ranting about a little board we were making to fit on the back of a Nextion to make it wireless.

NextionWell yesterday was a very productive day – the boards came back from China.  Somehow they’d managed to disconnect the top floor layer from earth – hence the keen eye will notice a little extra soldering and a wire in this prototype – but we’ve had a good learning experience out of it.

So the basic idea was to make a very small board that would sit on the back of a Nextion – and using a soft UART, talk to the Nextion, allowing MQTT control of output to the board and similarly MQTT output from buttons etc.  I got all of that working some time ago but wanted a board to play with to test and that is the purpose of this one.

Nextion[6]In the process we’ve realised that this very small board is good as a general purpose one and immediately we sat down and looked at the board, knowing fine well they’d have to do another batch – we came up with ideas for improvement, implemented them – so the next version (maybe a couple of weeks or so) will actually bring out all of the IO to that side connector together with more ground pins.

Funny how you do things without thinking because you always have. On our last boards (Home control 2016) we had a button on GPIO2 for setting the web interface (WIFI and MQTT setup)  – this time we put a button on GPIO1 for resetting and forgot all about the web interface – and then of course the obvious thought occurred – why not do both on one button – hold before power up to program, hold after powerup for web interface. Makes sense really!

Display controller boardI’ve just made a VERY simple demo on the Nextion display itself – a line of text and 2 buttons – currently the display has been sitting overnight updating the time from Node-Red on my Pi every second… and I’ve tried hundreds of button presses and not lost any yet – the text in the button is a variation of an MQTT command using a tilde as a separator between topic and payload… so for example the buttons turn on of my modified SONOFFS on and off directly (in actual use the commands will talk to Node-Red which will then do the control but this was easy for testing).

So the Nextions can output text on a button press – the text I put in was for example

print “sonoff1/toesp~out0:1”

That is split up by the software in the backboard (same software I use elsewhere with a new “nextion” mode).

Of interest the serial software came straight off github, modified to remove a GPIO setup routine which interfered with other GPIO settings. Interrupt-drive serial comms – I’m running at 56k baud and it is working a treat. This of course leaves the normal serial available to program the little board via the FTDI connector holes (6 way connector).

That’s an ESP12 incidentally.

DisplayThe board has it’s own 3v3 regulation and the 4 way connector for power and serial simply wires through to the Nextion directly  - in the photos I used the smallest available Nextion board but of course this could be used with any of them.

For programming the Nextion, all we have to do is hold down the programming button on powerup and that tristates the ESP IO pins – allowing normal Nextion serial programming. Amazing the functionality you can get out of one button.

This prototype could well end up as a secondary heating display and control panel – don’t be put off by the simple test display- amazing what you can do with a little Powerpoint graphics.

I’ll do a more in-depth article soon when we get replacement boards and I’m waiting for a new board from Itead – might even make the backboard available. All we need now is a decent bezel (don’t say “just run one off on your 3d printer”) – cream – slim with wall fixings – yeah, good luck with that, I know.

Watch this space for drastically improved display and new ideas. I’ve always wanted a decent low-cost WIFI touch display.. and now… it is within sight.

facebooktwittergoogle_pluspinterestlinkedin

Nextion WIFI Touch Display

$
0
0

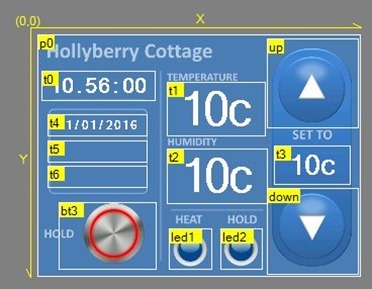
Nextion BezelThis project is a development of previous (home control 2016) work on the Nextion touch serial displays and offers a WIFI-controlled (MQTT) touch display which can be used with the full range of Nextion displays from the little 320*240 display you see here, up to the 7” model. If you like this please vote for it in the esp8266.com 1st Annual Competition – entrant 75.

Last updated 18/03/2016 to better explain uses of the control board.

The background to this is the ESP8266 software we developed for general use, which loosely started off as a MQTT demonstration and grew over time to become general purpose ESP8266 software written in C to make good use of the various IO pins of the ESP8266 and MQTT as a communication protocol. The peculiarities of the Nextion display is that it is normally communicated with serially. The serial lines of the ESP8266 are really needed for programming and debugging and also put out some debug info on power-up at 78k so that was really a non-starter and so a software UART was added to the code to provide a second serial line at 56Kbaud to control the Nextion.

There is a video of this example display here. The example image shown above right is merely a prototype as we await Rear View of the WIFI serial boarddelivery of a new 3D printer at which time we’ll put together a better front bezel. In this case I need a thermostat for a holiday rental installation and used this here merely as an example of what a serial WIFI display could be used for. The techniques I’ve used are applicable to a wide range of products.

The board mounts onto the back of any of the various displays with simple double-sided adhesive foam and as you’ll see in this example connects to the Nextion serial connector.

So the basis here is that we have an MQTT controlled touch display with haptic feedback and visual indication of button change of state.

Nextion DisplayIn this example there are only two states for each button i.e. on and off and as the Nextion Editor cannot handle rounded transparent PNG images we use another way., The editor has a feature called “crop image” in which you can select an overall backdrop image but on demand replace any rectangular area with a window through to another image. So all that is required in this case are 2 images as shown below, one featuring everything turned off – the other with everything turned on.  I should point out that at the time of writing a major update to the Nextion editor is in the works! More on that in a future article.

Compared to trying to match background colours to simulate transparent PNG files, this method works extremely well. Of course you don’t have to use PowerPoint but I find it produces the best results for the least work.

Powerpoints for Nextion Powerpoints for Nextion

If you look at the two slides/images above you’ll see the difference and how a series of rectangular windows to the second image could give the impression that we have both on and off states for individual buttons – and even pressed states in the case of the up/down buttons.

Nextion EditorOf course – using our code is probably well over-kill and may not suit your purposes – really all you need do is ensure you have a software UART on the ESP which is able to run at up to 56kbaud – you could use a slower baud rate as long as you don’t wish to fire TOO much information at the Nextion display (though it the most likely area of issue would be returned data – you should have a software UART that is running under interrupts).

We keep our instructions to and from the Nextion displays down to a minimum of complexity. In the image on the right you’ll see how this all looks inside the Nextion Editor.

On the right we define hotspots for touch sensitivity – which COVER the various buttons and those hotspots can be defined not only to return a value when pressed but also to change to make use of the “crop image” feature of the Nextion – to show part of ANOTHER image when required – and that is the second image of the two above.

For the likes of the up and down buttons – a touch press event in the editor like get "nodered~down" suffices to send out a message back – I’ve used a tilde to separate topic and payload in the message to be sent back out so that in this case it will be sending an MQTT message topic:”nodered” and payload:”down” – so you could send messages to Node-Red to communicate with controllers – OR you could control them directly by using the right topic and payload.  In the case of indicators, nothing is done at the display end – sending a message from Node-Red to, for example “led1” to tell it to use an alternative image is sufficient to make it look “on”.

Alternatively we may be simply displaying text. The Nextion does text in various sizes fairly well whereas image handling is not quite so good (no transparent PNG files yet and hence the “crop image” method). Even with a graduated background this method works well.

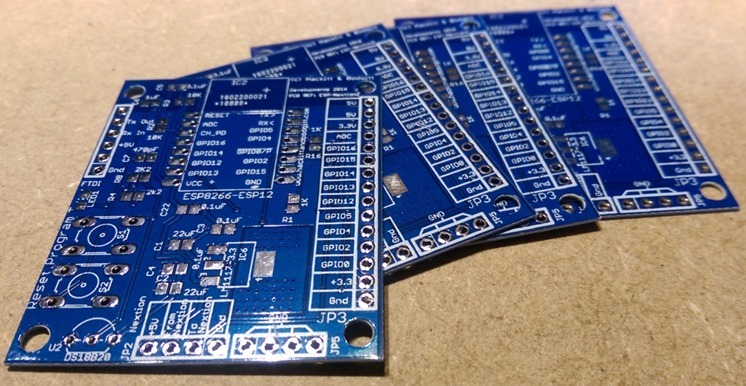
The board features reset and programming buttons to make life easy, an FTDI-compatible programming connector on the left and all the general IO pins are brought out to 0.1” on the right – this board will have many more uses than simply this display! What else does the software (which compiles under Windows – Unofficial Development Environment) do? Just about everything – RGB LEDs, PWM, general IO, software clock – there’s a WORD doc file with the project

Links:

Here is the link for the EAGLE files for the PCB, PNG files of same, a bill of materials for parts and Nextions own 3d printer file for a simple bezel (we will endeavour to produce a better one for our own use an include it in the coming weeks, time permitting). Also included my own demo PowerPoint file as used here.

esp8266.comHere is the link to the entire source code for the general purpose ESP code which includes commands to handle this display and to send out MQTT commands.  This is has been put together using the Windows unofficial Development environment using Eclipse.

If you like this – please vote for it (Entrant 75) – submitted for the ESP8266 Design Awards over at esp8266.com

Generalised software:

tmpC40BThere is of course (optionally) a LOT more to this board than just using the Nextion Displays… if you choose to use our software (which should compile without issue in Windows using the Unofficial Development environment) you can expect to be able to control the other ports via MQTT and serial. See the home control project on the blog – or the documentation file. I’ve just successfully tested the above boards to control GPIO0, 2,4,5,13,15 and 16 as outputs. GPIO2 is attached to the DS18B20 tracks on the board and simply dropping in a DS18B20 on the board will allow for temperature control (averaged and to the nearest degree C). You can also use DHT11 (not recommended as not very accurate) or DHT22 (more expensive but WAY better). Defines are in the petes_code.c file (I know – put them in a header).

Hackitt Boards

Using a standard FTDI and the Eclipse environment it is not necessary to use the reset button – simply press the programming button and start programming – then release. The reset is handled by a cap on the board and some Python software in the project. A future version will likely do away with the need to press the (GPIO0) programming button.

facebooktwittergoogle_pluspinterestlinkedin

esp8266 Annual Awards

$
0
0

esp8266.comJust a note to say THANK YOU to everyone who voted for the Nextion Wifi Touch Display over at esp8266.com in their first annual competition.  I just found out this morning that we won second prize, beaten to the top only by the excellent esp8266 Basic Interpreter – a great tool which will help get beginners up and running with ESP8266 chips.

And this is not the end of this project as the board has proven to be quite useful so we have another iteration on the way soon with an RGB LED as the general indicator and spacing for mounting a DHT11/22 as well as the normal Dallas temperature chip – neatly merging the board into the home control 2016 project.

So once again thanks to those who took the time to vote – quite made my day.

Nextion WIFI Touch Display

Facebooktwittergoogle_pluspinterestlinkedin

New PCB

$
0
0

After a slight hiccup with the new board (LED track missing) here’s the new board  – link for PCB here – as you can see, Aidan has made several improvements – smaller buttons, connector for DHT22 etc, markings for I2c (right now I only have support for the 8-output expander discussed elsewhere but more will follow as time permits) and general tidy up. Both the original LED and the new RGB LED are included – personally I find coloured lights for status a lot more useful than a flashing light – but of course they can use more power. As well as the LCD project this board has become a general purpose ESP-12 board and I now would not use any other.  We’ve not wasted cost putting USB on it because FTDIs are cheap and that reduces the end cost of the board.   The link above has all the files – please note we’ve NOT had delivery of these, the previous version was almost the same and works but for a track on the WS2812b.. so it is highly likely this board will be just fine – will be a couple of weeks or so before we know (delivery from China) and another week before I get my hands on one (Aidan is in the UK, I’m in Spain). The I2C markings are just to make it easier to remember which pins you use – we didn’t have enough room for yet another 4-way connector. If you are looking in for the first time – see the Nextion WIFI Display blog and the Home Control 2016 blog.

I’ll be trying this out on a brand new Nextion board I just received (faster processor I think – not tested yet – will blog when I do) along with some other stuff from Itead

Enjoy. For my next trick – a new board from SEEED…. review coming up later.


PCB

Facebooktwittergoogle_pluspinterestlinkedin

Nextion Update

$
0
0

As you may know the home control software can work with Nextion displays and there is a  project on the blog on that subject – I note that one or two people are having issues here so rather than reply without pictures –  here’s a general  update.

Home Control 2016 startupCurrently with the home control software, version 1.531 (see right) and Nextion Editor version 0.36 (it just updated on my automatically)  and I’m doing this on Windows 10.

After powering up the home control board, you MUST for the first time issue the instruction {set_serial:2} to the ESP8266 at which point the board will reboot and part of the start up serial info will show as on the right – “Initialised software serial to 57600 baud” – this indicates that the unit is ready to work with the Nextion display. GPIO4 and 5 are used for this purpose and the Nextion board can be powered directly from ours. Ground, to_nextion, from_nextion, 5v – that is how our board is marked but of course you don’t need to use our board. Incidentally don’t be tempted to use your 5v FTDI to power any but the smallest of Nextion boards – I tried this on the large 7” model and killed the FTDI…you’ll need a separate (common ground) power supply for that and most likely anything over the 4.2” display. Don’t forget to change that set_serial command if you plan to use GPIO4 and 5 for something else as the setting is stored in FLASH.

In a simple test I have a plain Nextion panel with two buttons on it. In the background to the page – in the Nextion Editor – I have a “preinitialize event” which contains nothing more than “bauds=57600” without the quotes – this ensures the Nextion board powers up at 57600 baud for the purpose of sending data back and forth.

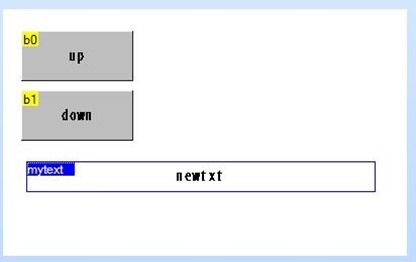
The two example buttons are marked “up” and “down” and the “touch press event” for each is as follows..

get “nodered~up”

and

get “nodered~down”

If you look at my documentation  – this is a notation I created that returns the above – for example the first one, to the ESP8266 and converts that into an MQTT message:

topic: nodered

payload: up

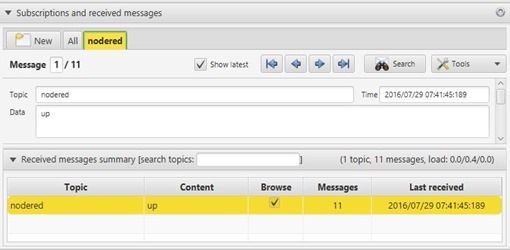
That’s it – press the up button and the message “up” is sent to topic “nodered” – could be any message you like – and any payload. You can use this directly to turn things on and off without even passing through Node-Red – OR you you have node-red intercept the incoming MQTT message and do something with it. So pressing a button might have an effect on the Nextion display for example. If you see the Nextion WIFI touch-display project you’ll see you can get WAY more ambitious than just a couple of buttons.

mqtt-spy

And lo – as I press buttons – you see the messages coming into MQTT-SPY (or whatever you use to test your MQTT).

That just leaves output to the Nextion itself from the board.

Again for the purposes of demonstration I add a text box in the Nextion editor – the default name for the first new text box would be “t0” so I rename this to “mytext”.

nextion text box

Not very pretty and normally I would NOT use their buttons etc. but make up my own imagery using PowerPoint or similar – but it’ll do for demo purposes.

Nextion displayNow I have to say, the worst part of this is the Nextion editor – progress is moving slowly with this – when you come to program it – make sure you have the right port address because it is hopeless at searching – and if it gets stuck you end up using task manager to reset it – comes up as PRJ or something – I’d so like to get my hands on the source code to give it a good shake-up.

Anyway, there it is- you end up with a window in this case with default text “newtxt”.

nextion display[5]Fire out the command {to_nextion:”mytext.txt=\”Hello\””}

You can do this serially or via MQTT- as the example from MQTT_spy shows.

This results in “Hello” without quotes appearing in the text box. Why the backslashes – that is to “escape” the quotes so they don’t end up terminating the string above – in other words so the quotes are passed through.

The WORD manual for my software describes the “to_nextion” and “set_serial” commands.

Have fun.

mqtt-spy[7]

Facebooktwittergoogle_pluspinterestlinkedin

Big Nextion

$
0
0

ITEAD DisplayQuite a while ago now I did a project based on the little Nextion displays, resistive touch-LCD displays which run on serial commands and come with an editor to make simply touch displays for even the simplest of micros.

Well, that project has proven to capture a lot of interest and I have one of those displays running 24-7 in a holiday rental property – and it has been doing that for a couple of years now.  I’ve not done anything new with the displays for a while but this morning, a new generation display turned up for me to take a look at.

The NX8048K070_011C is a new 7” Enhanced HMI Capacitive Touch Display complete with case (also available without the case) from Itead – the company who also produce the Sonoff units we’ve discussed many times in this blog.

The unit runs on 5v at 550ma and is to use the company’s own words, a powerful 7.0'' HMI TFT capacitive multi-touch display with a beautiful enclosure, with 32MB Flash data storage space, 1024 byte EEPROM, 8192 byte RAM, and GPIO supported.

The “GPIO supported” means there’s an 8-bit port connector. There is also an SD connector for storing info and a small 4-way connector for power, serial in and serial out.

So first things first – the advert headlines with $88 but in fact that is for the resistive version – for the capacitive version, add $20 for a total of $108 + shipping. The shipping via normal e-parcel was $11.40  (I’m only using dollars here because the ad is in dollars). DHL shipping is a horrifying $57 – but then I would not use DHL even if they threatened to cut off my toes. I STILL think the best thing ITEAD have done is the original Sonoff – and I say that because of the price. Right now they are going at $4.85, which for a boxed unit controlling the mains via WIFI is just stunning. The later units are in better boxes and are more powerful but by the time you reach $20 each the price to control a lamp is starting to get a little less enticing.

Anyway, I digress. So the Nextion displays work in a strange way – you don’t write directly to them like a typical Raspberry Pi display – but then you don’t have that overhead either. Once set up – which you do with the free “Nextion Editor” – the display merely needs serial text commands to do updates hence the simple 4-wire interface.

I’d rather hoped the rather nice display case would have some kind of feet – but instead it comes complete with 4 wingnuts which come complete with elongated bolts for mounting into existing installations.

One of the most annoying features of the original Nextions was the SD – you could not actually store data in it – that has now been addressed along with supplying real time clock, GPIO (well, on an ESP8266 you lose 2 wires to run the display so it can be useful to get that and more back) and of course the smoother capacitive touch display.

Display and caseThe actual display itself is only 800*480 which means you can see the dots but from any distance at all this is fine. The design of the case means it would easily fit into a cavity in a control panel and the whole thing is quite sturdy. I do wonder however why they made such a large case compared to the actual size of the LCD itself – as you can see in the photo.

As if to demonstrate the new features, when I powered up the Nextion display – it showed a swipe as you might find on modern smartphones – once I’d swiped, I was asked for a password (1111) – I put that in and the display proceeded to demonstrate the time and date. Might have made for a more posh demo if it hadn’t been set to 2044 – but never mind.

So, simple operation, nice easy, light touch compared to the older (but cheaper) resistive displays)  but at the end of the day, ease of use or otherwise comes down to the Nextion Editor – because they have done their own thing you really need to be able to use the editor to set the display up.

I downloaded the latest Nextion editor (free) on my Windows PC. After all this time it is still 0.47 – you might think considering the amount of time the Nextions have been out they would at least be to 1.0 – but then perhaps one should not judge a book by it’s cover.

Nextion Editor

It did occur to me that just MAYBE you could fit a little ESP8266 or NANO into that case – but on opening – no – not unless you cut off any connectors.   Oh, and I found out why the clock was wrong – there is indeed a battery connector on the board – but no battery was fitted – well, that accounts for that!

At this point, rather than going through all the fine detail of the , here’s a video.


Also take a look at my Nextion WIFI Touch Display -  the size is different but the general idea is the same. I’d like to hear from anyone who’s been using these displays for any length of time to hear what they think of the current editor – and what do you think of the price (please don’t write in to say you’ve used an old tablet  - already had that discussion). Is this good – or is there something better out there?

Facebooktwittergoogle_pluspinterestlinkedin

The post Big Nextion appeared first on Scargill's Tech Blog.

Nextion Displays and the ESP8266

$
0
0

the Nextion boxSo a parcel arrived for me this morning in the post. A Nextion display. And what is that, you may well ask?

Think of something like a thermostat or really any home control situation, at some point you have to stop sending text commands from an expensive PC and reduce the operation down to neat and tidy button pushing so that everyone else in the house can actually participate in your invention!

This is where things often fall down, the “Heath Robinson” home-made-looking box with pretty awful buttons telling everyone you have “amateur” status.   Now of course, today, you could choose to use a second hand phone or tablet for your wall-mounted family-friendly display and control panel… OR you can use a touch-sensitive display.

These are REASONABLY cheap – for example….  http://www.banggood.com/UNO-R3-ATmega328P-Board-2_4-Inch-TFT-LCD-Screen-Module-For-Arduino-p-945755.html

So this is an Arduino + touch display for under a tenner. You have to sort out libraries and basically write everything from scratch – and that’s fine – but time consuming.

Te Nextion PCBAnd so it was that my friend introduced me to the Nextion displays. This is a display board that isn’t too expensive – and which has everything built in. Essentially, on a PC you run a free editing program, tell it where you want buttons, text and images and what should happen when you press the buttons.  A button lets you download that to the Nextion board and “Bob’s your uncle”.

The board has only 4 pins – power (5v), ground, serial in, serial out. Press a button and stuff comes out of the serial pin at logic levels and 9600 baud.

You really can’t get any easier than this. Perfect? No, far from it. In my initial trials. the editor has some polishing to do, my first attempt at running the font convertor on a Windows SANS font produced a pretty awful output and I’ve clearly got a learning curve ahead of me – but after 15 minutes I have a display running with serial output on button press – that is one HELL of a lot faster than any other way I can think of.

Nextion displayThe board has another advantage over alternatives – the whole thing is very THIN and so will easily fit into a nice slim wall mounted case.

You could choose to run the board serially – OR via something like an ESP-01 and that is almost definitely what I will be doing.

I’ll have the EXP capture button outputs and send MQTT commands back to base – and accept MQTT commands and send them to the display.

Welcome to NextionWhen you first power up the unit, it comes up with a nice display and responds to button presses… so that gives you a feel for how things will work – that’s before you do any programming – just power the board up.

All you have to do is use the PC software to drop  in some screens, some buttons and some dials and off you go.

So that’s the theory – what is the board like in practice. I have to say that my first experience suggests that the translations have some way to go.  The simplest thing you can do is have a button send something out of the serial port when you press it.

GaugesThat is a 5 seconds job to implement – but it took me nearly an hour to realise because my friend who has already done this showed the use of an on-press function called PRINT which on his board works on it’s own. With the new software you build up commands and add a special command at the end to send everything out of the buffer. Until I found that command, mysteriously named “com_star” which I’m going to assume means “comms_start” – I was lost.

So commands tend to end with a binary zero for reasons I’ve not yet figured out… and at the end of any command, incoming or outgoing, you have 0xff 0xff 0xff  (i.e. 3 bytes each one binary 255).  That in itself makes testing interesting as a simple ASCII terminal might have difficulty with the terminating characters. Not sure what’s wrong with a simple carriage return myself – but I’m sure they have their reasons.

Now that I KNOW – it’s easy. Kind of – the manual needs a lot of work – but I guess it is early days yet – as long as they keep improving things, this little display could well be a winner.

The thing that stuns me the most – looking around the web – is people using this with an Arduino – with an ESP8266 stuck on the end for WIFI! Seems like major overkill to me not to mention the cost.  An ESP-01 talking to one of these devices, with 512k programming space on the ESP, it seems to me one could accomplish one hell of a lot!

Right now  I have the Nextion sending out instructions when a button is pressed, via it’s serial – at 115,200 baud. The text is encoded to be the same as my home control. My home control boards are of course ESP8266 and I’ve used a resistive divider on the serial input…  All good fun.

UPDATE: See comments in here – lots of issues with the software right now – this is not going to be as easy a ride as I thought…. comparison operations that just don’t work – we’ve been writing to the designers all day and I hope that our issues will be sorted. Right now you may want to consider this a work in progress – SO many possibilities but not without pain it would seem. More as we get responses to our questions.

Facebooktwittergoogle_pluspinterestlinkedin

The post Nextion Displays and the ESP8266 appeared first on Scargill's Tech Blog.


Raspberry Pi Serial and Node-Red issues

$
0
0

SOLVED: Node-Red serial I/O

serial

Looks simple doesn’t it – tie RX and TX together on your Raspberry Pi and press the button – text comes out of the other end – except that it doesn’t. More likely the Pi will CRASH (not something you see every day).

Serial out seems fine – no error messages, you can change baud rate and according to my scope, all is fine on pin 8 of the RPi2.  Input on the other hand, can cause interrupt issues, messages on the console and crashing – and almost never actually produces any output.

So what is the problem?Well, one of the guys at the Node-Red forum set me onto this link.  http://jeelabs.org/2012/09/20/serial-hookup-jeenode-to-raspberry-pi/

And therein lies the problem – by default – the RPI uses the serial port for communications. Trying to add another hook to the serial in interrupt – kills the Pi.

The solution is simple – extracted from the above link.

  1. edit the file /etc/inittab as root (I used “sudo vi /etc/inittab”)
  2. change this line: T0:23:respawn:/sbin/getty -L ttyAMA0 115200 vt100 to#T0:23:respawn:/sbin/getty -L ttyAMA0 115200 vt100. I.e. comment it out, and save these changes.
  3. run the command “sudo kill -1 1” to pick up these inittab changes

And that  - was that  - I now have comms in and out  - the idea being to put a serial display such as the NEXTION onto the Pi with simple touch input commands – and an output display showing status, temperature etc. DODDLE in Node-Red once you have serial up and running.

Facebooktwittergoogle_pluspinterestlinkedin

The post Raspberry Pi Serial and Node-Red issues appeared first on Scargill's Tech Blog.

Nextion Talking Thermostat

$
0
0

main page on Peter Scargill's talking thermostatYes, I changed the title. As often happens with these things, I got carried away.

The Nextion display is a touch-sensitive intelligent display.  Essentially, you buy the display and you program it with a free editor serially – which lets you easily place icons, buttons, images, text, gauges and more on the screen. For any of these you can have the unit send serial messages on press, release etc. You have serial control over the display itself and you can have as many “pages” of information as you want.

So for example if I place a text box called “mytext” on page “home” then I can send the serial command home.mytext.txt=”Hello”

Easy. So it can then talk to just about any micro – Raspberry Pi, ESP8266, Arduino etc via a simple 2-way serial link. What’s not so easy is the fact that it is taking them a long time to get the editor and interpreter right and some stuff just doesn’t work – even basic comparisons in it’s internal interpreter. Having discovered that when I first looked at the product, I put the Nextion to one side for a while. You can’t do multiple copy and paste, if you delete a library image you have to change the ID of all other images you’ve used – the list goes on – my suspicion is that one overworked, underpaid guy is doing all the development and it’s the first time he’s done this. I could be wrong.

NOT withstanding the above – the display has tremendous potential and you can work your way around most of the issues.

This week I began to think of the display from another angle. What DOES work is image, button and text placement, serial updating and serial out. So basically if you think of the Nextion as a programmable dumb terminal, then THAT works and works well once you get used to and work around the issues (images stored on the device are stored by number. Get rid of one and all your references are wrong. Just little things like that.

Security on Peter Scargill's talking thermostatI began to ponder how it would be if I used Node-Red on the Raspberry Pi (or on anything that handles Node-Red and serial, really) to do the work – after all, there are no real limits to program complexity on the latter and it works – so use the Nextion for what it is good for!

With that in mind I set about installing the serial node on Node-Red – that went very smoothly (using Raspi-Config initially to turn the serial on).  The first hurdle however didn’t take too long – the Pi crashed whenever I tried to use serial in. It turns out that RPi already has it’s own use for the serial – as a terminal. So this has to be disconnected first.

sed -i "s|T0:23:respawn:/sbin/getty -L ttyAMA0|#T0:23:respawn:/sbin/getty -L ttyAMA0|g"  /etc/inittab
kill -1 1

At a terminal I issued the above commands – in other words commenting out the start-up condition that has the Pi using the serial in interrupt– and also killing it now to save having to reboot.

That done, I tried again – there is still some information in the serial buffer at power up which I’ve yet to figure out how to stop – but matters not, it’s easy to clear out the serial buffer during init in Node-Red.

controls on Peter Scargill's talking thermostatThe next hurdle… the Nextion (quite reasonably) expects normal 8-bit serial strings – and sends back normal 8-bit strings – in each case with 3 characters appended to the end. FF FF FF.   or 255, 255 255 (why couldn’t they use \n like normal people… however…), All of that is great but Javascript, which is the base language behind NodeJS – and hence used in the functions of Node-Red – uses 16 bit strings!!

I had to get onto the guys working on Node-Red for help here – and to cut a long story short, a simple function added to the Serial nodes sorts that problem out. Great support is available for Node-Red on Google forums.

So in my case I wanted a simple thermostat display with up and down controls. I have a property which we holiday-rent out in the summer and that is about as much as I’d like end-users to control.  On the other hand, when we’re at home I want to do so much more.  So I decided that what was needed was a basic stat display page, a login page, a menu page then as many extra pages as needed.

The only control on the home page other than up and down would be a little menu button taking you off to a keypad log in – and maybe an “about” page. That would be the end of the line for our customers who would then have only one option – return to the home page.

For my wife and I, successfully logging in would then take us to a menu – and all pages would come back to that menu – which would also include a log-out button and of course I’d want RGB lighting control, heating adjustments etc etc….

Armed with a dumb Nextion with buttons and textboxes in place, I set about writing code for Node-Red. I would need outputs for serial, debug and MQTT to control things based on key input from the display.

Node-Red flows on Peter Scargill's talking thermostat

One of the things I like about Node-Red is that you can outline things long before you actually put code in – and that helps simplify programs. So as you can see here, I have serial coming in – it gets converted from the format that the Nextion understands – to simple text and back.  In addition you need start-up conditions – and display automatic updating – hence the two inject nodes. Using global variables for temperature and set temperature, I wanted it so that if I changed those variables elsewhere they would update on the display.

Pallette on Peter Scargill's talking thermostatThe Nextion online manual will tell you how to upload fonts and images to the Nextion – you can use buttons – or you can use images and overlay rectangular hot-spots on the image.  Their own buttons are AWFUL and it is hard to get fonts off your PC to look good as there is no anti-aliasing – however – by a combination of static images and using variable text only where actually needed, it is possible to get a nice looking screen or screens.

About page on Peter Scargill's talking thermostatAt some point I will document all of this – the “process commands” function is the most complex and even then, really it is mainly a set of nested switches and little else. The thermostat logic I’ve done separately but may do again to take into account humidity and outside temperature – not rocket science. They key here is that the Raspberry Pi seems to be quite solid as long as you keep SD writing to a minimum. It is now quiet simple thanks to BerryBoot to make backups…. as long as Nextion don’t totally annoy everyone by releasing the editor before it is ready – I see a bright future for this setup. The display I’m using is the 400*240 touch display. I have a pop up page for selecting light colours as I plan to use this for lighting control – not quite there yet but the mechanisms are in place – right now I’m having way too much fun doing the thermostat bit!!

As for the display, well basically for inspiration I went off looking to see what the pros are up to with displays and a particular Honeywell display caught my eye. Next thing I was off to PowerPoint to design the screens – it now looks only superficially like the original – but I liked the way they split up the main screen into sections.

Oh, and these displays are NOT expensive – check out AliExpress for example.

International options on Peter Scargill's talking thermostatNow, you might think “enough is enough” but I’ve also been working on speech for the Raspberry Pi and as of today I’ve pretty much gotten to grips with that – and so I thought – why not. You’ll notice on the “about” page over on the right, there’s a “multi-lingual audio introduction” – and why not – it’ll give the guests a laugh. The stat function has 2 on-off times a day and weekdays and weekends are programmed separately. There is a manual override for the “set” temperatures which lasts until the next change of settings. So if you set the unit for one temperature in the morning until lunchtime and another from lunchtime on – manual override done in the morning will last until lunchtime before going back to the default settings.

My third success of the week – taking my router back to factory default seems to have solved the “race” condition that’s been plaguing me – which means my ESP8266s are working again – the good part of that was that I originally thought it was the ESP8266s themselves causing problems so I’ve tightened up on handling lost of WIFI situations which seems to have made them more or less bullet-proof.  As of this morning the full set of thermostat background controls are in and all that is left to do is implement the actual logic – a little something to stop excessive turning on and off, a little hysteresis…. and we’re reaslider on Peter Scargill's talking thermostatdy to rock!

Next step – web-socket to serial conversion – though I could use MQTT – so that I can have a slave one of these stats powered by a little ESP8266.  Our cottage has upstairs and downstairs and so it would be handy to have both the master control and a copy of that upstairs.

NEXT: Coming up – lighting control…. I have already made the panel (who knew I could design graphics) and there’s a little logic to go to make it work but as you can see here the slider panel is well under way…

Despite the resistive interface, the sliders are quite responsive and should work well as a local alternative to my normal JQuery Mobile panels for local use around the house.

Facebooktwittergoogle_pluspinterestlinkedin

The post Nextion Talking Thermostat appeared first on Scargill's Tech Blog.

Some thoughts on Node Red variables

$
0
0

In learning how to use Node-Red I’ve changed my coding countless times as I’ve found better ways to do things.

Please note that in 2017, the way I use global variables here is out of date. It still works but for example context.global.fred=1 is now written as global.set("fred",1). Read this later article on using globals and context variables.

I’m currently working on my thermostat code using a Nextion touch-sensitive display, Raspberry Pi2 as controller and ESP8266s for relay and temperature/humidity sensing. This was a slow-running project until my old Arduino-based heating controller packed in yesterday without warning and so now the fate of the household heating is in the hands of an on-going project.

So the general idea is easy enough – lots of settings for weekdays and weekends, read sensor, control relay. That’s pretty much it in a nutshell except that on my first attempt I didn’t take into account power cuts – and when the power was restored to the Pi, hardcoded defaults took over instead of the settings I’d put in using the display.

So there’s a need for lots of variables and a means to store them permanently. This is what I’ve come up with and the logic behind it:

In order to pass variables around in Node-Red, you need to use “context.global” variables as these are the only ones that will work from page to page (i.e. from powering up node-red to powering down across all pages of your project). This can make for messy variable names for those of us who like to keep things short because we’re lazy or developing typists finger.

context.global.stat_inside_temperature

etc..

I’m a C person and so a struct is ideal for me – keeps everything together.  The nearest I get to that in JavaScript is an object and that’s fine.

A global object containing everything to do with my stat.

   var stat = {
display_temperature : 22,
display_humidity : 45,
heating : 0,
display_external_temperature : 14,
display_external_humidity : 54,
display_status : "Normal",
display_target_temperature : 20,
display_enabled : 0,
display_last_page : "home",
display_last_colour : 0,
pass : "",
display_dim : 60,
peak : 21,
night : 16,
frost : 12,
hold : 0,
weekon : 480,
weekoff : 720,
weon : 480,
weoff : 720,
week2on : 780,
week2off : 1380,
we2on : 780,
we2off : 1380,
temperature_manual_override : 0,
update : 0
};

That stat var of course is only valid while the relevant function is in use and is invisible outside of that particular page hence…

context.global.stat=stat;

So now we have a nice but somewhat longwinded way to access the variables..

context.global.stat.display_temperature;

(I know I should probably use displayTemperature but there’s no global replace in the Node-Red editor (hint)).

Because JavaScript objects are passed by reference – you can use a reference to this in other pages which makes things a little more readable.

var stat=context.global.stat

Hence

stat.display_temperature;

That’s more like it and you can write to that new variable and it will update the original as they are one and the same.

The obvious solution for storing variables permanently, is a database, but I’m trying to minimise that to keep writes down for the time when I run all of this and much more on an SD (currently using a little 2.5” drive with the Pi2).

The file node lets you read and write text files and so the next challenge was how to get that object into a text file – easy:

msg.payload=JSON.stringify(context.global.stat);

That JSON string can be saved directly to disk and the inverse is true of course…

context.global.stat=JSON.parse(msg.payload);

The good part of that is that the string saved to disk is readable and if need be directly writeable.

Thankfully when the file node reads a file if the file is not there, it returns “undefined” so in my function I check for undefined and if so – create a new one with defaults in it. I added a timeout variable in there and whenever I update any item in the object I also set a counter to 10.  That counter is decremented every second and when it reaches zero, the object is updated on disk. That means I can do all sorts of adjusting of controls on the Nextion display and only when I’m done will there be a single block write to the disk. The READ is only done once when Node-Red powers up.

Seems like a reasonable solution and it’s nice and warm in here.

In an earlier blog you’ll see my Nextion display solution which is quite pretty ( created my own imagery because built-in Nextion options are currently not that good) – here just for reference is the current Node-Red block controlling the display and the stat itself including disk reading and writing.

tmp7866

Facebooktwittergoogle_pluspinterestlinkedin

The post Some thoughts on Node Red variables appeared first on Scargill's Tech Blog.

Nextion Displays and the ESP8266

$
0
0

the Nextion boxSo a parcel arrived for me this morning in the post. A Nextion display. And what is that, you may well ask?

Think of something like a thermostat or really any home control situation, at some point you have to stop sending text commands from an expensive PC and reduce the operation down to neat and tidy button pushing so that everyone else in the house can actually participate in your invention!

This is where things often fall down, the “Heath Robinson” home-made-looking box with pretty awful buttons telling everyone you have “amateur” status.   Now of course, today, you could choose to use a second hand phone or tablet for your wall-mounted family-friendly display and control panel… OR you can use a touch-sensitive display.

These are REASONABLY cheap – for example….  http://www.banggood.com/UNO-R3-ATmega328P-Board-2_4-Inch-TFT-LCD-Screen-Module-For-Arduino-p-945755.html

So this is an Arduino + touch display for under a tenner. You have to sort out libraries and basically write everything from scratch – and that’s fine – but time consuming.

Te Nextion PCBAnd so it was that my friend introduced me to the Nextion displays. This is a display board that isn’t too expensive – and which has everything built in. Essentially, on a PC you run a free editing program, tell it where you want buttons, text and images and what should happen when you press the buttons.  A button lets you download that to the Nextion board and “Bob’s your uncle”.

The board has only 4 pins – power (5v), ground, serial in, serial out. Press a button and stuff comes out of the serial pin at logic levels and 9600 baud.

You really can’t get any easier than this. Perfect? No, far from it. In my initial trials. the editor has some polishing to do, my first attempt at running the font convertor on a Windows SANS font produced a pretty awful output and I’ve clearly got a learning curve ahead of me – but after 15 minutes I have a display running with serial output on button press – that is one HELL of a lot faster than any other way I can think of.

Nextion displayThe board has another advantage over alternatives – the whole thing is very THIN and so will easily fit into a nice slim wall mounted case.

You could choose to run the board serially – OR via something like an ESP-01 and that is almost definitely what I will be doing.

I’ll have the EXP capture button outputs and send MQTT commands back to base – and accept MQTT commands and send them to the display.

Welcome to NextionWhen you first power up the unit, it comes up with a nice display and responds to button presses… so that gives you a feel for how things will work – that’s before you do any programming – just power the board up.

All you have to do is use the PC software to drop  in some screens, some buttons and some dials and off you go.

So that’s the theory – what is the board like in practice. I have to say that my first experience suggests that the translations have some way to go.  The simplest thing you can do is have a button send something out of the serial port when you press it.

GaugesThat is a 5 seconds job to implement – but it took me nearly an hour to realise because my friend who has already done this showed the use of an on-press function called PRINT which on his board works on it’s own. With the new software you build up commands and add a special command at the end to send everything out of the buffer. Until I found that command, mysteriously named “com_star” which I’m going to assume means “comms_start” – I was lost.

So commands tend to end with a binary zero for reasons I’ve not yet figured out… and at the end of any command, incoming or outgoing, you have 0xff 0xff 0xff  (i.e. 3 bytes each one binary 255).  That in itself makes testing interesting as a simple ASCII terminal might have difficulty with the terminating characters. Not sure what’s wrong with a simple carriage return myself – but I’m sure they have their reasons.

Now that I KNOW – it’s easy. Kind of – the manual needs a lot of work – but I guess it is early days yet – as long as they keep improving things, this little display could well be a winner.

The thing that stuns me the most – looking around the web – is people using this with an Arduino – with an ESP8266 stuck on the end for WIFI! Seems like major overkill to me not to mention the cost.  An ESP-01 talking to one of these devices, with 512k programming space on the ESP, it seems to me one could accomplish one hell of a lot!

Right now  I have the Nextion sending out instructions when a button is pressed, via it’s serial – at 115,200 baud. The text is encoded to be the same as my home control. My home control boards are of course ESP8266 and I’ve used a resistive divider on the serial input…  All good fun.

UPDATE: See comments in here – lots of issues with the software right now – this is not going to be as easy a ride as I thought…. comparison operations that just don’t work – we’ve been writing to the designers all day and I hope that our issues will be sorted. Right now you may want to consider this a work in progress – SO many possibilities but not without pain it would seem. More as we get responses to our questions.

Facebooktwittergoogle_pluspinterestlinkedin

The post Nextion Displays and the ESP8266 appeared first on Scargill's Tech Blog.

Raspberry Pi Serial and Node-Red issues

$
0
0

SOLVED: Node-Red serial I/O

serial

Looks simple doesn’t it – tie RX and TX together on your Raspberry Pi and press the button – text comes out of the other end – except that it doesn’t. More likely the Pi will CRASH (not something you see every day).

Serial out seems fine – no error messages, you can change baud rate and according to my scope, all is fine on pin 8 of the RPi2.  Input on the other hand, can cause interrupt issues, messages on the console and crashing – and almost never actually produces any output.

So what is the problem?Well, one of the guys at the Node-Red forum set me onto this link.  http://jeelabs.org/2012/09/20/serial-hookup-jeenode-to-raspberry-pi/

And therein lies the problem – by default – the RPI uses the serial port for communications. Trying to add another hook to the serial in interrupt – kills the Pi.

The solution is simple – extracted from the above link.

  1. edit the file /etc/inittab as root (I used “sudo vi /etc/inittab”)
  2. change this line: T0:23:respawn:/sbin/getty -L ttyAMA0 115200 vt100 to#T0:23:respawn:/sbin/getty -L ttyAMA0 115200 vt100. I.e. comment it out, and save these changes.
  3. run the command “sudo kill -1 1” to pick up these inittab changes

And that  - was that  - I now have comms in and out  - the idea being to put a serial display such as the NEXTION onto the Pi with simple touch input commands – and an output display showing status, temperature etc. DODDLE in Node-Red once you have serial up and running.

Facebooktwittergoogle_pluspinterestlinkedin

The post Raspberry Pi Serial and Node-Red issues appeared first on Scargill's Tech Blog.

Viewing all 32 articles
Browse latest View live